Quickstart Guide
This guide will help you get set up to use djoauth2 with an existing Django
project. The code repository also includes a finished example for
comparison; that page includes instructions for setting it up.
Requirements
DJOAuth2 has been tested and developed with the following:
- Python 2.7
- Django 1.4+
- Django AppConf 0.6
DJOAuth2 uses South for migrations. For the Django 1.4.X series we support South version 0.7.6; for Django 1.5.X and 1.6.X we support South version 0.8.4.
Adding djoauth2 to an existing application
First, add djoauth2 to the INSTALLED_APPS list in your project’s
settings.py:
INSTALLED_APPS = [
  'django.contrib.auth',
  'django.contrib.contenttypes',
  'django.contrib.sessions',
  'django.contrib.sites',
  'django.contrib.messages',
  'django.contrib.staticfiles',
  'django.contrib.admin',
  'south',
  # ...
  # ... your other custom apps
  # ...
  'djoauth2',
]
If you’re not already using South, make sure to also add south to the
list of INSTALLED_APPS.
Optionally, for developing without SSL (NOT for production code), add the
following setting to turn off djoauth2‘s SSL-enforcement:
DJOAUTH2_SSL_ONLY = False
Do not set this to False in production code: SSL is mandated by the
specification. This value is only designed to make it easier to develop with
OAuth.
Install the models:
python manage.py syncdb
python manage.py migrate djoauth2
In Django 1.5+, djoauth2 will respect your custom User model if you have
one configured (with the AUTH_USER_MODEL setting.) In Django 1.4, or 1.5+ if
you’re not using a custom User model, the djoauth2 models will link to the
django.contrib.auth.models.User object.
Run the tests — they should all pass!
python manage.py test djoauth2
Now that we know that djoauth2 works, it’s time to set up the URL endpoints
so that clients can make requests. Although the library handles all of the
logic for us, we will have to set up some endpoints — to do so, we’ll update
our project’s urls.py file and add an application to hold the
endpoints. For the purposes of this demo we’re going to call it
oauth2server, but you could name it anything you’d like.
Here’s what the urls.py file from our project should look like:
# coding: utf-8
from django.conf.urls import patterns, include, url
from django.contrib import admin


admin.autodiscover()

urlpatterns = patterns('',
    # Admin, for creating new Client and Scope objects. You can also create
    # these from the command line but it's easiest from the Admin.
    url(r'^admin/', include(admin.site.urls)),

    # The endpoint for creating and exchanging access tokens and refresh
    # tokens is handled entirely by the djoauth2 library.
    (r'^oauth2/token/$', 'djoauth2.views.access_token_endpoint'),

    # The authorization endpoint, a page where each "resource owner" will
    # be shown the details of the permissions being requested by the
    # "client".
    (r'^oauth2/authorization/$', 'oauth2server.views.authorization_endpoint'),

    # The page to show when Client redirection URIs are misconfigured or
    # invalid. This should be a nice, simple error page.
    (r'^oauth2/missing_redirect_uri/$', 'oauth2server.views.missing_redirect_uri'),

    # An access-protected API endpoint, which we'll define later.
    (r'^api/user_info/$', 'api.views.user_info'),
)
As you can see, it references an endpoint defined by djoauth2 (the
access_token_endpoint) and two others (authorization_endpoint and
missing_redirect_uri) that we say exist in our oauth2server
application. The oauth2server application only exists to define those
two views — here’s what the views.py file should look like:
# coding: utf-8
from django.shortcuts import render
from django.http import HttpResponse
from django.forms import Form

from djoauth2.authorization import make_authorization_endpoint


def missing_redirect_uri(request):
  """ Display an error message when an authorization request fails and has no
  valid redirect URI.

  The Authorization flow depends on recognizing the Client that is requesting
  certain permissions and redirecting the user back to an endpoint associated
  with the Client.  If no Client can be recognized from the request, or the
  endpoint is invalid for some reason, we redirect the user to a page
  describing that an error has occurred.
  """
  return HttpResponse(content="Missing redirect URI!")

authorization_endpoint = make_authorization_endpoint(
  # The URI of a page to show when a "client" makes a malformed or insecure
  # request and their registered redirect URI cannot be shown.  In general, it
  # should simply show a nice message describing that an error has occurred;
  # see the view definition above for more information.
  missing_redirect_uri='/oauth2/missing_redirect_uri/',

  # This endpoint is being dynamically constructed, but it also needs to know
  # the URI at which it is set up so that it can create forms and handle
  # redirects, so we explicitly pass it the URI.
  authorization_endpoint_uri='/oauth2/authorization/',

  # The name of the template to render to show the "resource owner" the details
  # of the "client's" request. See the documentation for more details on the
  # context used to render this template.
  authorization_template_name='oauth2server/authorization_page.html')
The template passed to the make_authorization_endpoint helper will be
rendered with the following context:
form: a DjangoFormthat may hold data internal to thedjoauth2application.client: Thedjoauth2.models.Clientrequesting access to the user’s scopes.scopes: A list ofdjoauth2.models.Scope, one for each of the scopes requested by the client.form_action: The URI to which the form should be submitted – use this value in theaction=""attribute on a<form>element.
The template in our example application is included below. Please
note that it is important to include the {{form}} context —
djoauth2 may use this to hold information across authorization requests.
Currently, the user_action values must be "Accept" and "Decline".
{% if client.image_url %}
  <img src="{{client.image_url}}">
{% endif %}

<p>{{client.name}} is requesting access to the following scopes:</p>

<ul>
  {% for scope in scopes %}
  <li> <b>{{scope.name}}</b>: {{scope.description}} </li>
  {% endfor %}
</ul>


<form action="{{form_action}}" method="POST">
  {% csrf_token %}
  <div style="display: none;"> {{form}} </div>
  <input type="submit" name="user_action" value="Decline"/>
  <input type="submit" name="user_action" value="Accept"/>
</form>
And with that, all of the OAuth routes are implemented! All that’s left is to
set up an API endpoint that requires clients to have been authorized via OAuth
— we referenced it in the URL conf by the name api.views.user_info. We’re
going to create a new application, api, to hold this view. In your own app,
there’s no need to create a new application, and you can simply use existing
API views.
The api/views.py file:
# coding: utf-8
import json

from django.http import HttpResponse
from django.views.decorators.csrf import csrf_exempt

from djoauth2.decorators import oauth_scope


@csrf_exempt
@oauth_scope('user_info')
def user_info(access_token, request):
  """ Return basic information about a user.

  Limited to OAuth clients that have received authorization to the 'user_info'
  scope.
  """
  user = access_token.user
  data = {
      'username': user.username,
      'first_name': user.first_name,
      'last_name': user.last_name,
      'email': user.email}

  return HttpResponse(content=json.dumps(data),
                      content_type='application/json',
                      status=200)
(Any existing endpoint can be easily protected by our @oauth_scope
decorator; just modify the signature so that it expects a
djoauth2.models.AccessToken as the first argument. For more
information, see the djoauth2.decorators.oauth_scope
documentation.)
With our code all set up, we’re ready to set up the DB and start the webserver:
python manage.py syncdb
python manage.py migrate
      python manage.py runserver 8080
Now, log in to the admin page and create a Client and a Scope. Set up
the client so that the redirect_uri field is a valid URI under your
control. While testing we often use URIs like http://localhost:1111 that
don’t point to any server. The scope’s name should be the same as that used
to protect the api.views.user_info endpoint — in this case, user_info.
Interacting as a Client
We’re ready to begin making requests as a client! In this example, we’ll grant
our client access to a scope, exchange the resulting authorization code for an
access token, and then make an API request. This is adapted from our example
project’s client_demo.py script, which you can edit and run yourself. Go
and check it out!
The first step is to grant our client authorization. Open a browser and visit the following URL:
http://localhost:8080/oauth2/authorization/?
  scope={the name of the scope you created}&
  client_id={the 'key' value from the Client you created}&
  response_type=code
If it worked, you should see the results of rendering your authorization
template. If you confirm the request, you should be redirected to the
registered client’s redirect_uri. If you use a value like
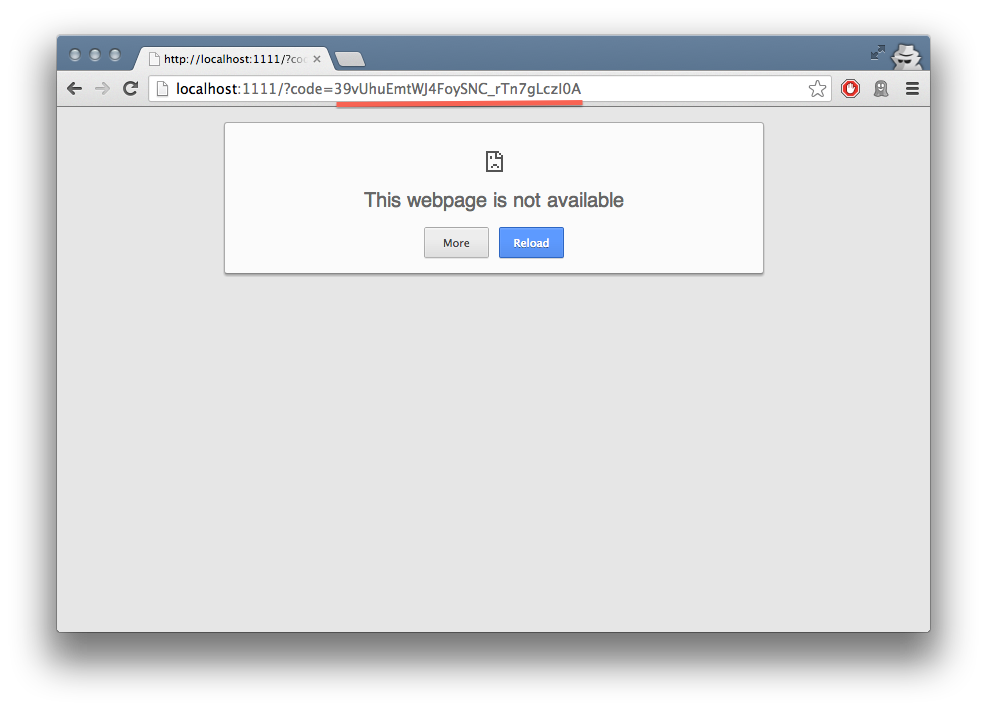
http://localhost:1111, your browser will show a “could not load this page”
message. This is unimportant — what really matters is the code GET
parameter in the URl. This is the value of the authorization code that was
created by the server.
We must now exchange this code for an access token. We do this by making a
POST request like so:
POST http://localhost:8080/oauth2/token/ HTTP/1.1
Authorization: Basic {b64encode(client_id + ':' + client_secret)}

code={authorization code value}&grant_type=authorization_code
The Authorization header is used to identify us as the client that was
granted the authorization code that we just received. The value should be the
result of joining the client ID, a :, and the client secret, and encoding
the resulting string with base 64. In Python, this might look like:
import requests
from base64 import b64encode
token_response = requests.post(
  'http://localhost:8080/oauth2/token/',
  data={
    'code': 'Xl4ryuwLJ6h2cTkW5K09aUpBQegmf8',
    'grant_type': 'authorization_code',
  },
  headers={
    'Authorization': 'Basic {}'.format(
        b64encode('{}:{}'.format(client_key, client_secret))),
  })
assert token_response.status_code == 200
This will return a JSON dictionary with the access token, access token lifetime, and (if available) a refresh token. Continuing the example from above:
import json

token_data = json.loads(token_response.content)
access_token = token_data['access_token']
refresh_token = token_data.get('refresh_token', None)
access_token_lifetime_seconds = token_data['expires_in']
With this access token, we can now make API requests on behalf of the user who granted us access! Again, continuing from above:
api_response = requests.post(
  'http://localhost:8080/api/user_info/',
  headers={
    'Authorization': 'Bearer {}'.format(token_data['access_token'])
  },
  data={})
assert api_response.status_code == 200
print api_response.content
# {"username": "exampleuser",
#  "first_name": "Example",
#  "last_name": "User",
#  "email": "exampleuser@locu.com"}
While the access token has not expired, you will be able to continue making API
requests. Once it has expired, any API request will return an HTTP 401
Unauthorized. At that point, if you have a refresh token, you can exchange it
for a new access token like so:
token_response = requests.post(
  'http://localhost:8080/oauth2/token/',
  data={
    'refresh_token': 'h9EY74_58aueZqHskUwVmMiTngcW3I',
    'grant_type': 'refresh_token',
  },
  headers={
    'Authorization': 'Basic {}'.format(
        b64encode('{}:{}'.format(client_key, client_secret))),
  })

assert token_response.status_code == 200

new_token_data = json.loads(token_response.content)
new_access_token = new_token_data['access_token']
new_refresh_token = new_token_data.get('refresh_token', None)
new_access_token_lifetime_seconds = new_token_data['expires_in']
As long as you have a refresh token, you can continue to exchange them for new access tokens. If your access token expires and you have lost the refresh token value, the refresh request fails, or you were never issued a refresh token, then you must begin again by redirecting the user to the authorization page.